Installation
I assume you have ClyphX Pro already installed. If not here is a link to an installation video
What’s in the package?
In the folder you should find those files:
- user_actions
- init.pyc
- ExtUa.pyc
- Meters.pyc
- TrackClipListener.pyc
- OSCActions.py
- TouchOSC
- TrackListener.tosc
- Ableton set
- Track Clip Listener Demo set.als
- ClyphX Setting
- add_this_to_Preferences.txt_for_OSC_Output
1. User action files
Put the files from the user_actions folder into this folder, located in Ableton’s User Library.
If you haven’t moved it, it is usually here:
MAC: ~user~/Music/Ableton/User Library/Remote Scripts/
WINDOWS: ~user~/Music/Ableton/User Library/Remote Scripts/
If you are not sure where your Ableton User Library is, you can look it up in Settings(LIVE12) / Preferences(LIVE11)
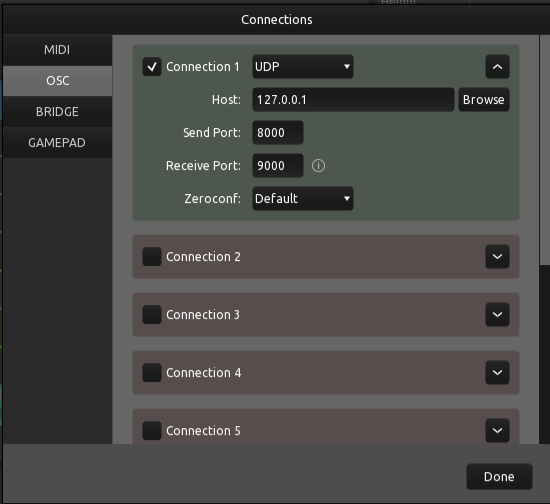
2. OSC Configuration
If you haven’t already set up OSC Output communication, you have to add some lines in Preferences.txt By default the OSC Settings in Preferences looks like this:
#************************************* OSC SETTINGS] **********************************
# This setting determines the OSC port number that ClyphX Pro will receive OSC messages from.
# The possible settings are any OSC port number.

INCOMING_OSC_PORT = 8000
To enable the OSC Output, you need to define the OSC Port as well as the Network Address (IP). I recommend using 127.0.0.1 which is the same machine (localhost). Then you can open up TouchOSC on the same machine and see if everything works.
OUTGOING_OSC_PORT = 9000
OSC_DEVICE_IP_ADDRESS = 127.0.0.1
Open up TouchOSC and set the Receive and Send port “opposite” to the settings above:
3. Test
Do the user actions work?
Open up the provided Ableton Set and scroll to the very right and trigger the clips in the track “TEST”:
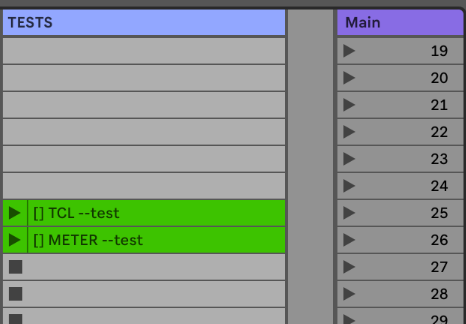
If you can see a message in the status bar, the user actions are working properly. If not, check out the Troubleshooting Section. If this does not help, send me a “fresh” log file as described there and I’ll try to get you sorted.
Check the OSC Connection
Open up the provided TouchOSC Layout and trigger the clip: you should see the navigation buttons open up on the TouchOSC Layout.
If successful you are ready to go!
Installation & First Run
- Place
TrackClipListener.pyin yourClyphX_Pro/UserActionsfolder. - Restart Ableton Live or reload ClyphX Pro.
- Important: You must generate the OSC bindings for ClyphX to “hear” your TouchOSC template. Run the action:
[] WRITEXOSC.
Settings.txt
Upon the first run, a file named Track Clip Listener Setting.txt is created in your Settings folder.
| Setting | Default | Description |
|---|---|---|
SLOTS |
8 |
Number of vertical clip slots (Scenes) per track. |
GRIDTRACKS |
8 |
Number of horizontal tracks (for Grid Mode). |
METERS |
TRUE |
If TRUE, creates standard ClyphX Meter bindings. |
FOLLOW_ARRANGEMENT_CLIPS |
TRUE |
If TRUE, Row 0 displays clips playing in Arrangement View. |
FOLLOW_SCENE_TRIGGER |
FALSE |
If TRUE, the grid scrolls vertically to follow launched scenes. |
GRID_OFFSET |
0 |
Visual offset for Scene Follow (e.g., 1 shows the scene before the playing one). |
DEFAULT_MODE |
TRIGGER |
Startup mode for buttons: TRIGGER (launch) or SELECT (focus). |
LINKED_CONTROL_SURFACE_SLOT |
None |
Link a Control Surface (Ring) to the OSC Grid (1-6). |